SCCM : Softwareless Task Sequence
For a while now we were having the issue that the Task Sequence would fail at random times causing the helpdesk to lose a lot of time as they would have to restart an already lengthy TS (nearing 4 hours). As the failures would mostly occur during the installation of applications, I started to think about removing the applications from the TS and installing them through collections afterwards.
To keep the convenience of selecting software profiles (from UI++) the idea was to add the system to a specified collection during OSD which has the software deployed to it. As it was not an option for me to simply add a script to the Task Sequence to connect to configuration manager and add the device to the collection from there (due to security restrictions and such) a slightly different approach was required.
Since I’ve used status messages to report the status of the OSD to teams I figured it would be nice if I could generate my own status message which could be picked up by Configuration Manager to add the device to the collection.
Requirements:
To not reinvent the wheel, I’ve found a script that could set a status message, the content can be downloaded from the GitHub link below, we also need 2 dll files which can be downloaded from the NuGet link below (after downloading the NuGet file simply rename it to .zip and unpack it)
- https://github.com/MattiasC85/Send-CMMessage
- NuGet Gallery | Microsoft.ConfigurationManagement.Messaging 5.2006.1037.1000
The files:
- Send_CMMessage.ps1
- FakeCert.pfx
- SMS_GenericStatusMessage_infoQuals.txt
- SMS_GenericStatusMessage_infoProp.txt
- Microsoft.ConfigurationManagement.Messaging.dll
- Microsoft.ConfigurationManagement.Security.Cryptography.dll
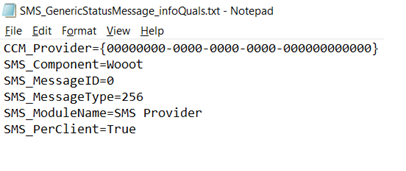
In the file SMS_GenericStatusMessage_infoQuals.txt you can change the value of SMS_Component to your desire, default is ‘Wooot’, it does not really matter as you can pass it as an argument to the script as well:
Preparations in Configuration manager:
The files need to be added into a package since these will be included in the task sequence.
To do this place the content on a network share (i.e. the software share), then in configuration manager, go to: Software Library > Packages > Create Package:
- Give the package a name.
- Check the box ‘this package contains source files, then enter then path to the content

- Select, ‘do not create a program’ as we’re only using the package as a container, the command we will specify in the Task Sequence.
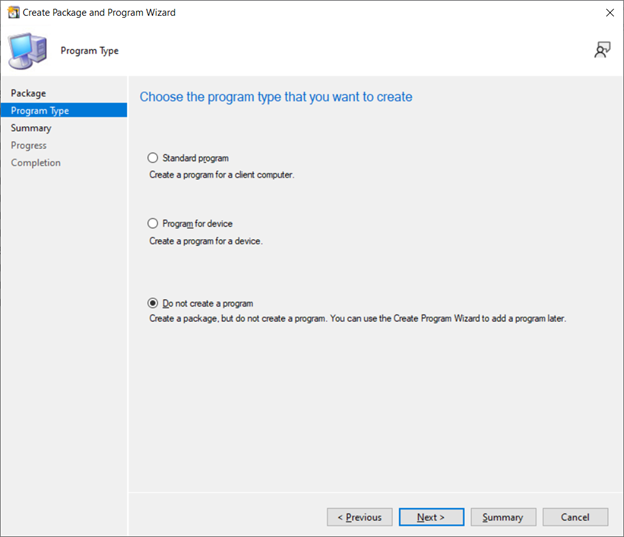
- Complete the wizard
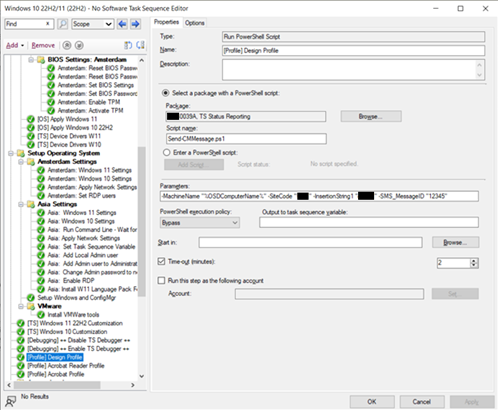
Next we need to create the step in the Task Sequence that will send the status message.
In the Task Sequence create a step to run a PowerShell script: Add > General > Run PowerShell Script.
- Select a package with a PowerShell script, then click browse and select the previously created package.
- Under script name enter the name of the script, default: Send-CMMessage.ps1
- Under parameters we’re sending the following:
- -Machinename %OSDComputerName% : This uses the OSDComputerName TS variable to set the System in the message.
- -SiteCode <your side code> (ie ABC): this sets the sitecode which is required for the script to work
- -InsertionString1 <the value you want to pass> : This can, for example, be a wildcard variable passed from UI++ to select the profile. This string is passed with the message, strangely you can’t see this in the actual status message but it can be used with %msgis01. (If you change the message ID to 1073781821 it will show the insertion string as the description, strangely this message ID will show on a different ID-number in the status messages).
- -SMS_MessageID “12345”: This is the message ID we’re sending which we will use along with the component to make the status filter rule work it’s magic.
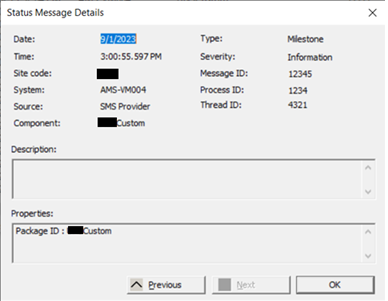
Now if the Task Sequence is run this step should generate a message looking something like this
Status Messages:
To make it easier to find these messages I’ve created a custom Status Message Query by going to : Monitoring > System Status > Right click: Status Message Queries > Create Status Message Query:
Under Name give the query a name, then click Edit Query Statement…
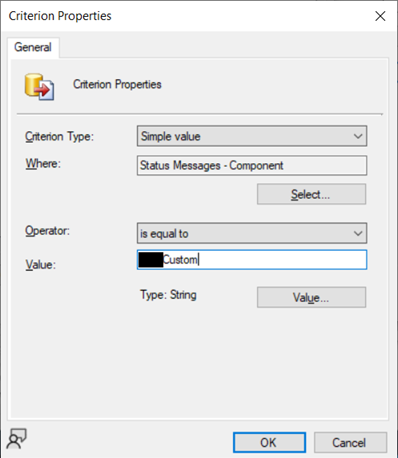
- Click the tab ‘Criteria’ then click the ‘sun’ symbol, click the select and in the pop-up that shows select from Attribute Class: Status Messages, attribute: Message ID and click OK, under operator select ‘is equal to’ , as value the same ID as entered in the TS Step (in our case ‘12345’), click ‘OK’ until you’re back on the Criteria tab in the Query Statement Properties window, then click the ‘Sun’ button again an do the same steps again but selecting ‘Component’ from the Status Messages attribute class, then select the ‘is equal to’ operator and as Value enter the value that’s set as SMS_Component in SMS_GenericStatusMessage_infoQuals.txt
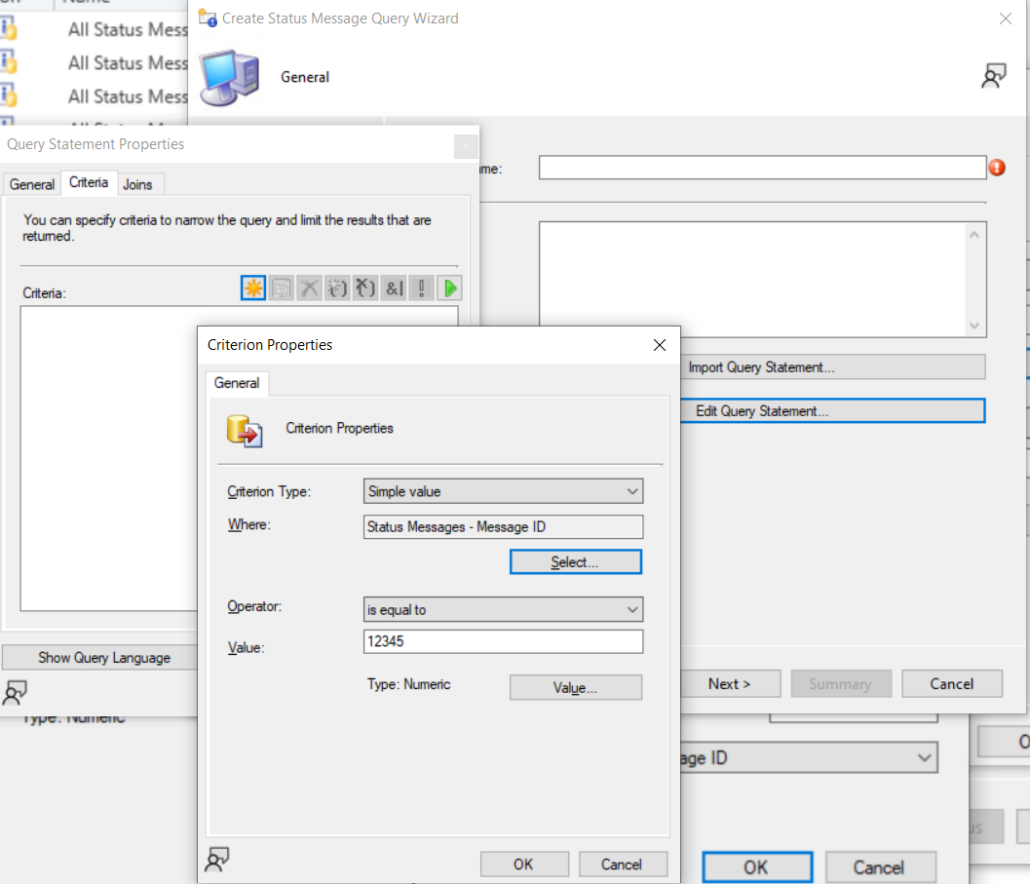
Click ‘OK’ on the ‘Criterion Properties’ and on the ‘Query Statement Properties’ and complete the ‘Create Status Message Query’ wizard.
To view the messages simply right click the Query and select ‘Show Messages’.
Status filter rules (and code):
To add the system to a collection we need a script, this script needs to be stored in a location accessible for the site server, so it’s probably best to store it on the server itself. We will also need to configure a status filter rule to run the script.
Note:
The code inside the connect-site function is you can copy when you choose to open the powershell ise from the configuration manager console (top left icon). The rest of the code is and early version of the code I’ve written myself and has been tested to work and it’s just meant as an example.
param (
$system,
$profile = "default"
)
function connect-site {
#
# Press 'F5' to run this script. Running this script will load the ConfigurationManager
# module for Windows PowerShell and will connect to the site.
#
# This script was auto-generated at '5/16/2023 9:00:13 AM'.
# Site configuration
$SiteCode = "ABC" # Site code
$ProviderMachineName = "Site.server.com" # SMS Provider machine name
# Customizations
$initParams = @{}
#$initParams.Add("Verbose", $true) # Uncomment this line to enable verbose logging
#$initParams.Add("ErrorAction", "Stop") # Uncomment this line to stop the script on any errors
# Do not change anything below this line
# Import the ConfigurationManager.psd1 module
if((Get-Module ConfigurationManager) -eq $null) {
Import-Module "$($ENV:SMS_ADMIN_UI_PATH)\..\ConfigurationManager.psd1" @initParams
}
# Connect to the site's drive if it is not already present
if((Get-PSDrive -Name $SiteCode -PSProvider CMSite -ErrorAction SilentlyContinue) -eq $null) {
New-PSDrive -Name $SiteCode -PSProvider CMSite -Root $ProviderMachineName @initParams
}
# Set the current location to be the site code.
Set-Location "$($SiteCode):\" @initParams
}
connect-site #connect to the site
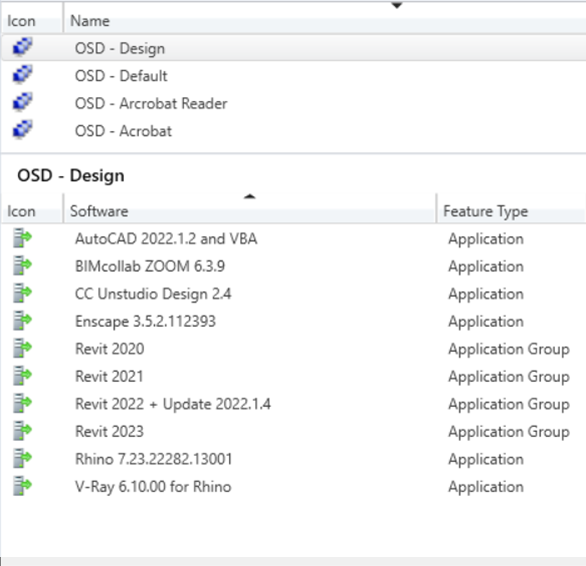
#collections used for OSD software
$collections = @{}
$collname = "design"
$collection = "OSD - Design"
$collections.add($collname,$collection)
$collname = "acrobatreader"
$collection = "OSD - Arobat Reader"
$collections.add($collname,$collection)
$collname = "acrobatdc"
$collection = "OSD - Acrobat"
$collections.add($collname,$collection)
#End of Collections
#checking if the device is already in any OSC Collections and remove it if so
foreach ($item in $collections.values) {
$OSD = (Get-CMCollectionMember -CollectionName "$item" -ErrorAction SilentlyContinue).name
if ($OSD -gt $null){
$OSD
if ($OSD.contains($system)){
write-host "System $system is in collection $item , removing $system."
Remove-CMDeviceCollectionDirectMembershipRule -CollectionName "$item" -ResourceName "$system" -Force
}
}
else { write-host "Collection is emtpy..."}
}
$IDS = get-cmdevice -name "$system" #get any device with the name in $system
if ($IDS.length -gt 1){
$ID = (get-cmdevice -name "$system" | where-object {$_.IsApproved -eq 1}).ResourceID #get the resource ID of the system needed to add to collection
$removeIDS = (get-cmdevice -name "$system" | where-object {$_.IsApproved -eq 0}).ResourceID #remove any duplicate resources that could have been created by the send-cmmessage script (should be fixed according to the github)
foreach ($ID in $removeIDS){
Remove-CMResource -ResourceId $ID
}
}
else {$ID = $IDS}
Switch ($profile) #select collection according to the profile set in the variable
{
"design" {$coll = $collections.design; break}
"acrobatreader" {$coll = $collections.acrobatreader; break}
"acrobatdc" {$coll = $collections.acrobatdc; break}
}
if ($profile -ne "default"){
Add-CMDeviceCollectionDirectMembershipRule -collectionname "$coll" -ResourceId $ID #add the system to the collection matching the specified profile
}
$default = $collections.default
Add-CMDeviceCollectionDirectMembershipRule -collectionname "$default" -ResourceId $ID #add the system to the default collection.The script connects to the CM Site, then it looks up the system, if there’s any duplicate systems it will remove any system that isn’t approved (according to the set message script the creation of duplicate devices should be solved but in some cases this still occurs so I’ve left it in my script). Then it adds the system to the specified collection according to the values specified in the collections hashtable. It will also add the system to the collection for default software.
Now everything is properly set and arranged we need to create the status message rule.
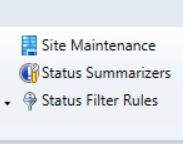
Go to : Administration à Site Configuration à Sites à Click the site à On the ribbon, click Status Filter Rules.
In the Status Filter Rules windows click ‘Create…’.
On the General tab check the box in front of the Component and set the value to the value of the Component in the status message (same as in the previously mentioned txt file). Also check the box in front of Message ID and enter the message ID specified in the Task Sequence as it’s value.
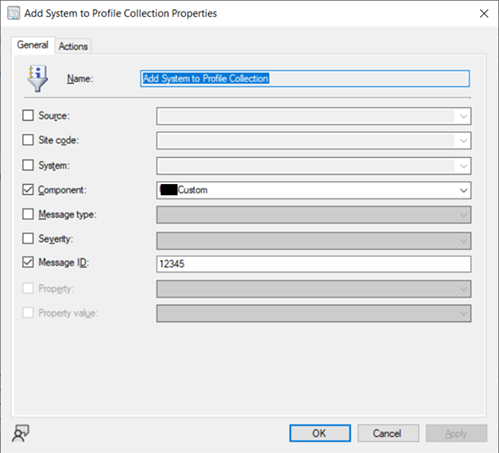
On the action page check the box in front of ‘Run a program’ and point to the script you want to run, this script should be in a location accessible by the site server.
To run the PowerShell I’ve created a little cmd file that will run the PowerShell, you should be able to run PowerShell directly but I had better results doing it through cmd in the past so I’m sticking with it, contents of the file:
@echo off
set computer=%1
set message=%2
powershell.exe -executionpolicy bypass -File “%~dp0add-collection.PS1” -system %computer% -profile %message%
Command line in Run a Program:
c:\windows\system32\cmd.exe /C “E:\Sources\Software\TS_Status_Reporting\add-collection.cmd” %msgsys %msgis01
The attributes we’ll use are:
- %msgsys for the computername
- %msgis01 to pick up the profilename.
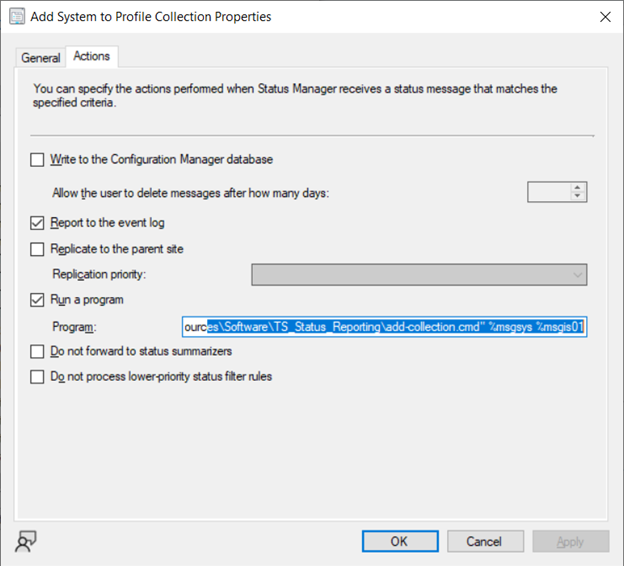
Click OK to complete the rule.
To have software be installed in the correct order we can either deploy a Task Sequence to the collection or we can create application groups in which we can set a priority for installation.
I’ve decided to go with a mixture of Applications and Application Groups as I think it’s more convenient to use than a Task Sequence.
If you have a lot of large applications you may need to increase cache size , in our case we’re installing 3 versions of Revit as default for our designers so this tends to fill up the client cache pretty fast.
Our helpdesk is very happy with this change as it saves them a lot of time because OSD went from ~4 hours to 30 minutes and systems wouldn’t fail the Task Sequence anymore. Also instead of having to wait for the Task Sequence to complete they could now start their post-OSD checklist while software was still installing saving them the extra time.
Leave a Reply
Want to join the discussion?Feel free to contribute!